When working with JEE as developers and/or administrators we have used JMS at some point. Most of us are very familiar with using Queues and ConnectionFactories provided by the JEE container in applications residing within the same container.
The posts detailing the process of connecting to and messaging a remote queue often do not cover all the methods of remote messaging.
With this post I would like to summarize at least three different ways of remote messaging that I am aware of:
- Messaging a remote queue by a simple client that is not deployed on any JBoss AS
- Messaging a remote queue by an application (WAR) that is deployed on a JBoss AS
- Messaging a remote queue thru a JMS bridge. The message is sent to a local queue on Server 1 which then gets forwarded to the remote queue on Server 2, with local queue and remote queue participating in a JMS Bridge
Prerequisites
For the purpose of executing the instructions and watching the messaging as a live demo, we need to have at least the following:
- Two running instances of JBoss AS (Wildfly), lets call them Server 1 and Server 2
- On Server 1:
- Local queues: LocalServer1Q, JMSBridgeSourceQ
- JMS Bridge: simple-jms-brdige
- A pooled-connection-factory using outbound JCA adapter
- On Server 2:
- Local queues: LocalServer2Q, JMSBridgeTargetQ
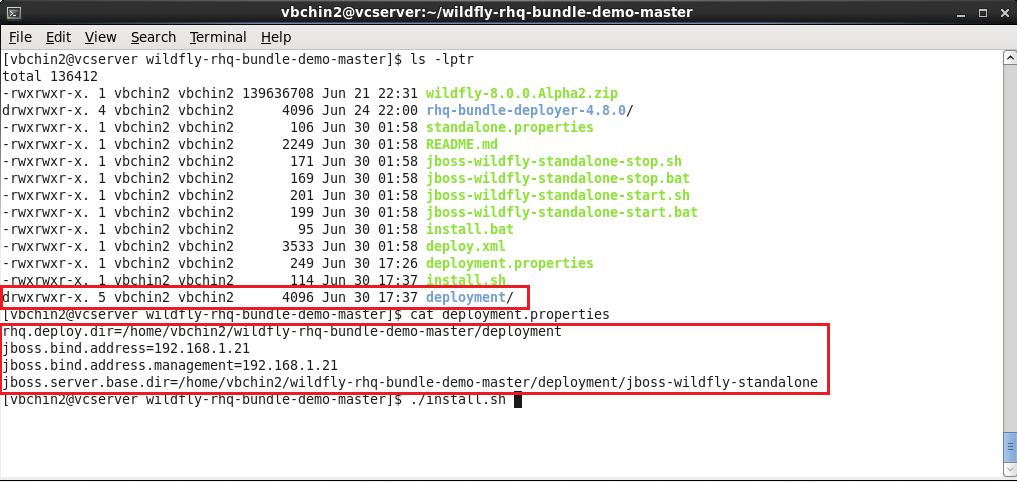
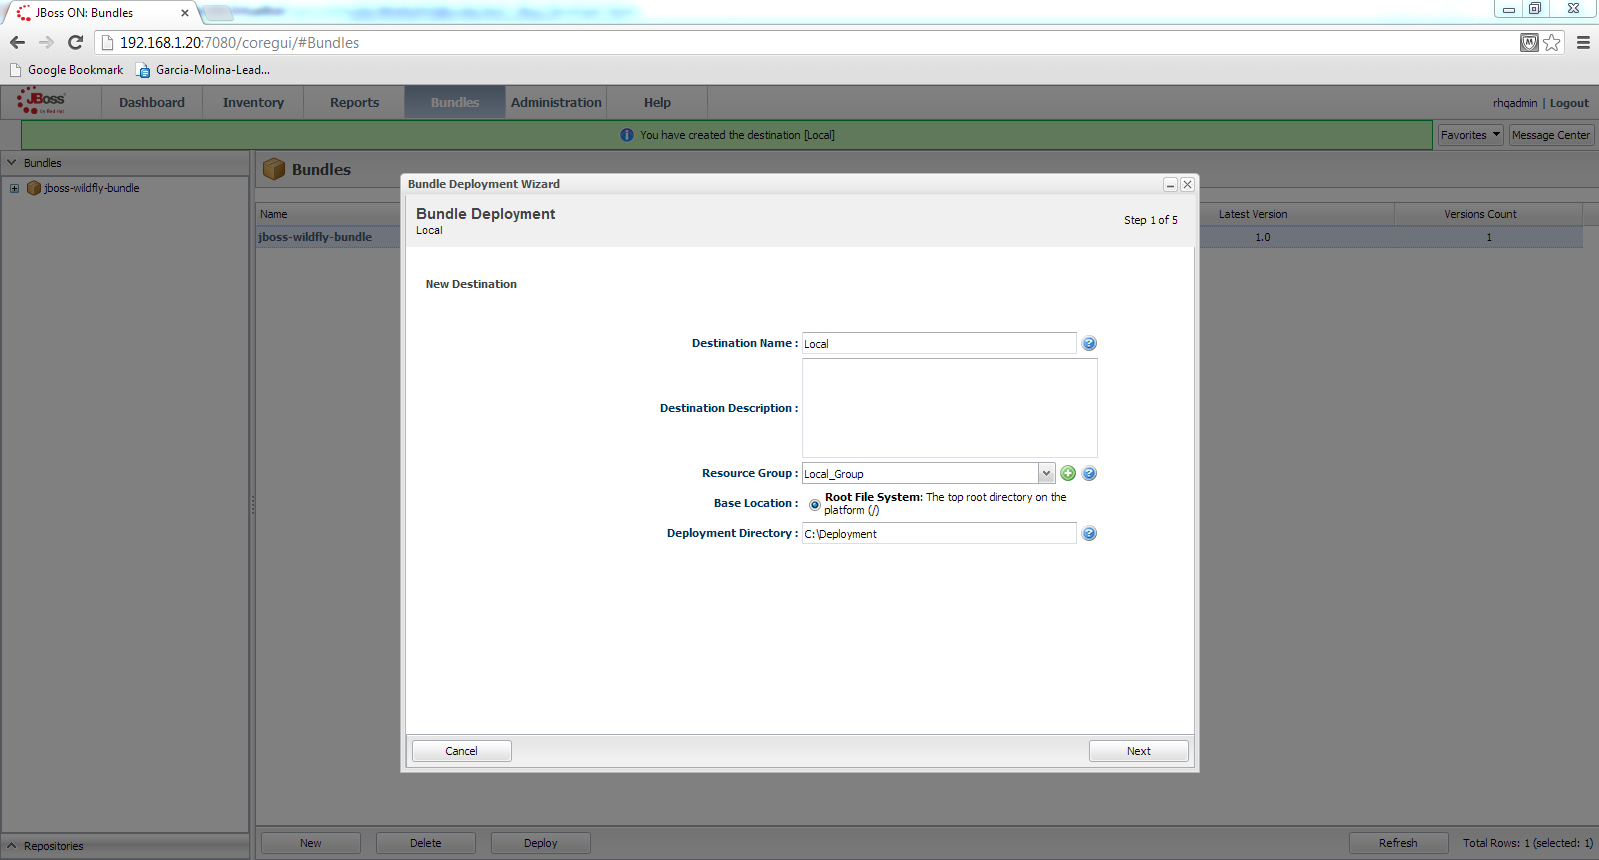
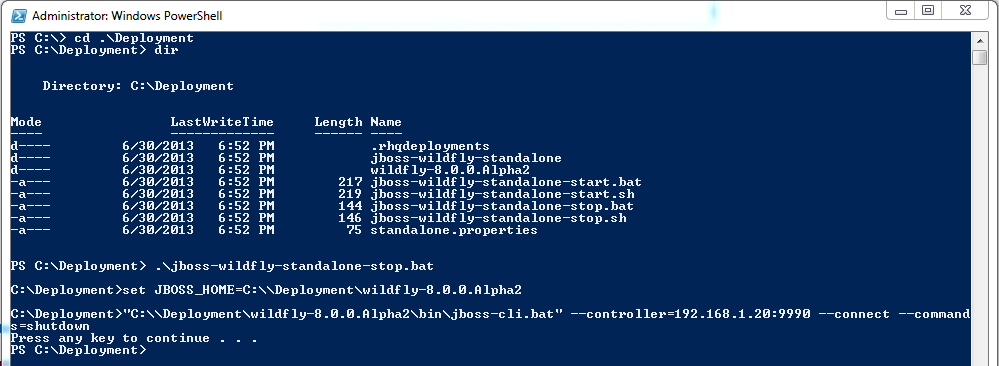
Visit my GitHub project here to download all the raw materials for the demo and to get started right away. Click on Download Zip to download the entire project as a zip file. After unzipping the project to the desired location follow the Pre-Installation and Command-Line Installation instructions. The installation process should take care of all the prerequisites listed above using JBoss CLI.
Case 1 - Remote messaging with a simple client
In this scenario we will be using a command-line client attempting to send message to the queue: LocalServer1Q on Server 1.
For any Java based client to be able to do that, it requires:
- The jar file jboss-client.jar in the classpath. Found usually under $JBOSS_HOME/bin/client
- Create a InitialContext object with properties as shown below. Key thing to note below is the URL format and port.
The URL format should be of the form remote://<Remote IP>:PORT. The default remoting port
is 4447. If you have started the server with a port-offset of 100 for example, then this port would be 4547 (4447+100).
Properties props = new Properties(); props.put(Context.INITIAL_CONTEXT_FACTORY,"org.jboss.naming.remote.client.InitialContextFactory"); // The URL below should point to the your instance of Server 1, if no // port offset is used for Server 1 the port can remain at 4447 props.put(Context.PROVIDER_URL, "remote://192.168.1.20:4447"); // Credentials are required when the security is enabled (default behavior) on the HornetQ server props.put(Context.SECURITY_PRINCIPAL, "USERNAME"); props.put(Context.SECURITY_CREDENTIALS, "PASSWORD"); InitialContext ic = new InitialContext(props); - Use the InitialContext object to lookup the Queue and the ConnectionFactory as shown below:
    remoteQueueCF = (ConnectionFactory) ic.lookup("jms/RemoteConnectionFactory");
    remoteQueue = (Queue) ic.lookup("jms/queues/LocalServer1Q");

    // You would have to provide the same username/password combination to create a connection
    // when the security is enabled on the HornetQ server
    remoteQueueConnection = remoteQueueCF.createConnection("USERNAME","PASSWORD");
Important Note :
For the remote client to be able to see the Queue and the ConnectionFactory, both should have JNDI entries that start with java:jboss/exported. The following snippet shows the usage. When looking up in the code however, you just need to pass what comes after java:jboss/exported in the JNDI entry (as shown above).
   ...
   <connection-factory name="RemoteConnectionFactory">
       <connectors>
           <connector-ref connector-name="netty"/>
       </connectors>
       <entries>
           <entry name="java:jboss/exported/jms/RemoteConnectionFactory"/>
       </entries>
       <ha>true</ha>
       <block-on-acknowledge>true</block-on-acknowledge>
       <retry-interval>1000</retry-interval>
       <retry-interval-multiplier>1.0</retry-interval-multiplier>
       <reconnect-attempts>-1</reconnect-attempts>
   </connection-factory>
   ...
   <jms-destinations>
       <jms-queue name="LocalServer1Q">
           <entry name="queue/LocalServer1Q"/>
           <entry name="java:jboss/exported/jms/queues/LocalServer1Q"/>
       </jms-queue>
   ...
Additional Reference:
- Refer to the simple-remote-messaging-client Maven project (included in the downloaded Zip file)
- For a more comprehensive example that details how to deal with a secured HornetQ server, follow the excellent Middleware Magic post here
Case 2 - Remote messaging with a local pooled-connection-factory
In this case we will be attempting to send a message to the remote queue (LocalServer2Q) but using a local pooled-connection-factory on Server 1. This way, the client doesn't need to know where the remote queue is located, this would have been taken care of by the administrator when he/she setup the pooled-connection-factory.
Why is this kind of connection so special ? Following is the entry straight from the official documentation:
- It is only available to local clients, although it can be configured to point to a remote server.
- As the name suggests, it is pooled and therefore provides superior performance to the clients which are able to use it. The pool size can be configured via the max-pool-size and min-pool-size attributes.
- It should only be used to send (i.e. produce) messages.
- It can be configured to use specific security credentials via the user and password attributes. This is useful if the remote server to which it is pointing is secured.
Local Server (Server 1) Side Setup
Following are the steps to prepare the local server:
- Add a new outbound socket-binding entry as shown and highlighted below. Make sure it is pointing
to the remote server's IP and messaging port. Since I had my Server 2 run with a port offset of
100, the messaging port is at 5545 (5445 + 100)
... <outbound-socket-binding name="mail-smtp"> <remote-destination host="localhost" port="25"/> </outbound-socket-binding> <outbound-socket-binding name="messaging-remote"> <remote-destination host="192.168.1.20" port="5545"/> </outbound-socket-binding> </socket-binding-group> - Add a new netty connector that uses the above socket binding
... <connectors> <netty-connector name="netty" socket-binding="messaging"/> <netty-connector name="netty-throughput" socket-binding="messaging-throughput"> <param key="batch-delay" value="50"/> </netty-connector> <netty-connector name="netty-remote" socket-binding="messaging-remote"/> <servlet-connector name="servlet" host="default-host" socket-binding="http"/> <in-vm-connector name="in-vm" server-id="0"/> </connectors> ... - Add a new pooled-connection-factory that uses the newly added netty-remote connector
        ...
        <pooled-connection-factory name="hornetq-ra-remote">
            <transaction mode="xa"/>
            <connectors>
                <connector-ref connector-name="netty-remote"/>
            </connectors>
            <entries>
                <entry name="java:/RemoteJmsXA"/>
            </entries>
        </pooled-connection-factory>
    </jms-connection-factories>
    ...
Use of pooled-connection-factory in Code
- Lookup the connection factory as shown below using the @Resource annotation
@Resource(mappedName = "java:/RemoteJmsXA") private ConnectionFactory cf; - Instead of looking up a queue, which you cannot since we are talking about a remote queue
, create a queue identity as shown below
    Connection connection = cf.createConnection();
    Session session = connection.createSession(false,Session.AUTO_ACKNOWLEDGE);

    /*
     * Important note here that you shouldn't try to lookup the remote
     * server queue from here as you do not need to. You are just
     * creating a queue identity here, not a physical queue.
     * http://docs.oracle.com/javaee/6/api/javax/jms/QueueSession.html#createQueue(java.lang.String)
     */
     Queue queue = session.createQueue("LocalServer2Q");
Additional References
- Refer to the simple-remote-messaging-webapp Maven project (included in the downloaded Zip file) with focus on PooledConnectionFactoryClient.java. The built WAR file goes on Server 1
Case 3 - Remote messaging with a JMS Bridge
In this scenario:
- We define a JMS bridge between queues JMSBridgeSourceQ on Server 1 and JMSBridgeTargetQ on Server 2
- The bridge definition goes onto Server 1
- The clients, local to Server 1, don't necessarily know the existence of a bridge when they send messages to the local queue JMSBridgeSourceQ. The bridge transparently *copies* the message over to the target queue JMSBridgeTargetQ
- The copy is only One-Way from Source to Target
Defining the JMS Bridge
The following snippet covers the XML entry for the bridge
     </hornetq-server>
     <jms-bridge name="simple-jms-bridge">
         <source>
             <connection-factory name="ConnectionFactory"/>
             <destination name="queue/JMSBridgeSourceQ"/>
         </source>
         <target>
             <connection-factory name="jms/RemoteConnectionFactory"/>
             <destination name="jms/queues/JMSBridgeTargetQ"/>
             <context>
                 <property key="java.naming.factory.initial" value="org.jboss.naming.remote.client.InitialContextFactory"/>
                 <property key="java.naming.provider.url" value="remote://192.168.1.20:4547"/>
             </context>
         </target>
         <quality-of-service>AT_MOST_ONCE</quality-of-service>
         <failure-retry-interval>1000</failure-retry-interval>
         <max-retries>-1</max-retries>
         <max-batch-size>10</max-batch-size>
         <max-batch-time>100</max-batch-time>
     </jms-bridge>
 </subsystem>
Few observations about the JMS Bridge entry in standalone-full-ha.xml
- The entry is below the <hornetq-server>
- To connect to the JMSBridgeSourceQ queue, local connection factory ConnectionFactory can be used
- To be able to connect to the JMSBridgeTargetQ, we would need to use the jms/RemoteConnectionFactory
- And the only way we will be able to lookup the jms/RemoteConnectionFactory is by defining the context of the lookup. The entries here are similar to the remoting lookup we saw in Case 1
Using the JMS Bridge in Code
Using a JMS bridge in code is no different from sending a message to a local queue hence you would find the instructions familiar
- Locate the connection factory and the queue by looking them up with @Resource annotation
@Resource(mappedName = "java:/ConnectionFactory") private ConnectionFactory cf; @Resource(mappedName = "java:/queue/JMSBridgeSourceQ") private Queue queue; - Use the connection factory and queue as you would normally when setting up a connection
    Connection connection = cf.createConnection();
    Session session = connection.createSession(false,Session.AUTO_ACKNOWLEDGE);

    MessageProducer producer = session.createProducer(queue);
Additional References
- Refer to the simple-remote-messaging-webapp Maven project (included in the downloaded Zip file) with focus on JMSBridgeClient.java . The built WAR file goes on Server 1
Consuming from a Remote Queue
So far we have seen how to *send* messages to be remote queue. Lets now see how to consume from remote queues.
Standalone Java Client
This scenario is similar to Case #1, except here we are attempting to consume from the remote queue. You can use the source code in RemoteQueueInteractor.java as an example. It has methods both for sending and receiving the messages connecting to a remote queue.
Remote MDB Client
In a JEE setting the recommended method to consume a message is thru the use of an Message Driven Bean (MDB). A MDB can be configured to take in values for the attribute activationConfig. Below is the sample use of a MDB connecting to a remote queue.
@MessageDriven(name = "RemoteMDB", activationConfig = {
     @ActivationConfigProperty(propertyName="destinationType", propertyValue = "javax.jms.Queue"),
     @ActivationConfigProperty(propertyName="destination", propertyValue = "testQueue"),
     @ActivationConfigProperty(propertyName="connectorClassName", propertyValue = "org.hornetq.core.remoting.impl.netty.NettyConnectorFactory"),
     @ActivationConfigProperty(propertyName="connectionParameters", propertyValue = "host=remoteHost;port=5445")})
Note that if you choose to use the embedded MDB in place in the downloaded project, any messages sent to LocalServer2Q will be consumed right away.
Additional References
- Refer to the simple-remote-messaging-webapp Maven project (included in the downloaded Zip file) with focus on RemoteMDB.java . The built WAR file goes on Server 1